Farming is one of the major activities one has to engage with in Orcish Inn. The overall farming is done by preparing the ground, planting seeds, waiting for plants to be fully grown and finally harvesting them. The harvested plant will return a crop item if fully grown. The gathered crop's quality depends on how well the seed fitted the ground. To get high quality crops, the player has to plant seeds on spots where the seeds' preferred wetness, eutrophy, windbreak and plant density meets the ground's current wetness, eutrophy, windbreak and plant density and keep them up as changes to one of the four properties directly affects the final crop's quality. The player can modify the ground's properties, e.g. by wetting land with the bucket or placing fences to increase windbreak.
Seeds, Plants and Crops[ | ]
There are several plant types in the game, but some of them aren't accessible right at the start and have to be unlocked with a Seed Trading Warrant, sold by the Hawker. Seeds are mainly sold by the Hawker or retrieved from harvesting fully grown plants. There are also seed bags brought back from exploration tours by pigeons, which have some seeds in them, and the Season Shaman will give you a seed bag every season.
| Seed Icon | Seed Name | Grown Plant | Crop Icon | Crop Name | Main Season | Requirement |
|---|---|---|---|---|---|---|
| Oat Seeds |  |
Oats | Spring | None | ||
 |
Barley Seeds | |
Barley | Summer | Trading Warrant | |
 |
Spelt Seeds |  |
Spelt | Autumn | Rank 1 Trading Warrant | |
 |
Rye Seeds |  |
Rye | Autumn | Rank 2 Trading Warrant | |
 |
Wheat Seeds |  |
Wheat | Autumn | Rank 2 Trading Warrant | |
 |
Hop Seeds |  |
 |
Hops | Spring | None |
 |
Belladonna Seeds |  |
 |
Belladonna | Spring | None |
| Pea Seeds | Peas | Spring | Rank 1 Trading Warrant | |||
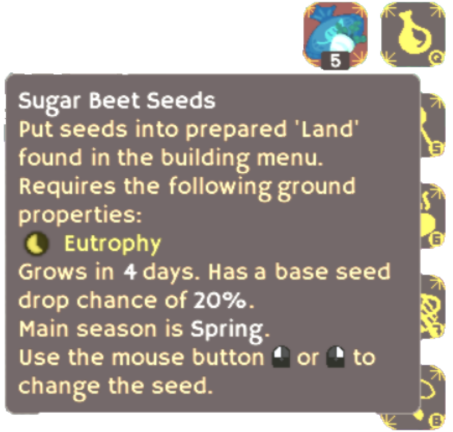
| Sugar Beet Seeds | Sugar Beets | Spring | None | |||
| Potato Seeds | Potatoes | Spring | Rank 1 Trading Warrant | |||
| Lettuce Seeds | Lettuce | Spring | Rank 2 Trading Warrant | |||
| Asparagus Seeds | Asparagus | Spring | Rank 3 Trading Warrant | |||
 |
Corn Seeds |  |
 |
Corn | Summer | Rank 3 Trading Warrant |
 |
Blueleaves Seeds |  |
 |
Blueleaves | Summer | None (?) |
 |
Sunflower Seeds |  |
 |
Sunflower | Summer | Rank 2 Trading Warrant |
 |
Scholar's Fire Seeds |  |
 |
Scholar's Fire | Summer | Collected from Celestial Seed Bags |
| Tomato Seeds | Tomato | Summer | None | |||
| Onion Seeds | Onions | Summer | Rank 1 Trading Warrant | |||
 |
Dryroot Seeds |  |
 |
Dryroot | Autumn | Rank 3 Trading Warrant |
 |
Cotton Seeds |  |
 |
Fiber | Autumn | None |
| Pumkin Seeds | Pumkin | Autumn | None | |||
| Berry Bush Seeds | Berry Bush | Autumn | Rank 1 Trading Warrant | |||
| Pepper Seeds | Peppers | Autumn | None | |||
| Colossus Carrot Seeds | Colossus Carrots | Autumn | Rank 2 Trading Warrant | |||
 |
Lotus Seeds |  |
 |
Lotus | Winter | Seed Pouch Upgrade 4 |
| Marram Grass Seeds | Marram Grass | N/A | None | |||
| Grass Seeds | Grass | N/A | None |
Preparing the Ground[ | ]
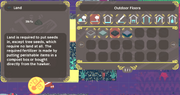
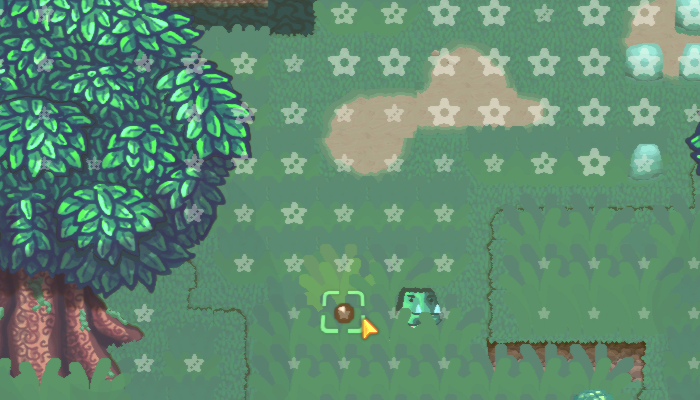
Seeds can't be planted everywhere, the ground has to be prepared first by placing a land tile. It is available in the building menu by clicking on the shovel tool and selecting the category for outdoor floors and then the land tile:


Ground Properties[ | ]
The ground has different characteristics, including wetness, eutrophy, windbreak and plant density. They affect the quality of the harvested crop. To display the wetness, eutrophy, windbreak and plant density of the ground, the player can click on the corresponding interface icons at the bottom of the screen or press F (wetness), G (eutrophy), H (windbreak) or J (plant density).


The colored buttons toggle the wetness, eutrophy, windbreak and plant density map, respectively (left to right).
The appearing colored strokes indicate the wetness (blue), eutrophy (yellow), windbreak (pink) or plant density (green), from small strokes for a low value up to big strokes for a high value.
Wetness[ | ]
The wetness map is displayed by clicking on the small blue toggle button at the bottom of the screen or by pressing F. Wetness is high near water. The player can modify wetness by picking up water with the bucket and wetting the land. The weather does influence the wetness, too, like rain increasing the wetness or a heat lowering it.


Eutrophy[ | ]
The eutrophy map is shown by clicking on the small yellow toggle button at the screen's bottom or by pressing G. The eutrophy is scattered across the map which isn't indicated by the environment (like water emitting wetness or objects emitting windbreak). With the help of a compost and the dung bag, the player can modify the eutrophy of the ground. Weather like heat also influences the eutrophy.


Windbreak[ | ]
The current windbreak can be investigated by clicking on the small pink button at the screen's bottom or by pressing H. Windbreak is high near objects while different objects have their own windbreak radius and strength. A stony fence has a higher windbreak radius and strength than a wooden fence.


Plant Density[ | ]
Plant density is shown by clicking on the small green button at the screen's bottom or by pressing J. The plant density is affected by farming plants only, even if they are in their seed state. Plants like grass, trees or bushes don't affect plant density. The player can increase a spot's plant density by placing many plants around that spot.


Seed Properties[ | ]
Every type of seed has its own preferences regarding the ground. A seed has a preferred value per ground property (wetness, eutrophy, windbreak and plant density), indicated by a circle ![]() as well as an importance
as well as an importance ![]() stating how much this ground property is relevant for the final quality of the harvested crop. As an example, the seed properties of barley are:
stating how much this ground property is relevant for the final quality of the harvested crop. As an example, the seed properties of barley are:
Every seed has its preferences regarding wetness, eutrophy, windbreak and plant density (circles). Every property has its own importance (diamonds), too. Shown are the preferences of the barley seed.
The following table states the properties and importance values of all seeds.
| Preference | Importance | ||||||||
|---|---|---|---|---|---|---|---|---|---|
| Seed Icon | Plant | Wetness | Eutrophy | Windbreak | Plant Density | Wetness | Eutrophy | Windbreak | Plant Density |
|
Barley | ||||||||
|
Spelt | ||||||||
|
Rye | ||||||||
|
Wheat | ||||||||
|
Corn | ||||||||
|
Belladonna | ||||||||
|
Blueleaves | ||||||||
|
Dryroot | ||||||||
|
Sunflower | ||||||||
|
Lotus | ||||||||
|
Hop | ||||||||
|
Cotton | ||||||||
|
Scholar's Fire | ||||||||
Barley needs a wetness of 5, an eutrophy of 4, a windbreak of 1 and a plant density of 6, all indicated by the colored circles. If a ground property map is currently shown, the strokes and the a small colored circle on the cursor indicate both the current value of a specific spot.
For the barley plant, wetness is far more important than all the other ground properties, indicated by 5 diamonds ![]() regarding the wetness property and 1 diamond
regarding the wetness property and 1 diamond ![]() for eutrophy, windbreak and plant density. These are relative measures, therefore ensuring the fitting wetness is 5 times more effective in increasing the final crop's quality than, for example, ensuring the correct eutrophy.
for eutrophy, windbreak and plant density. These are relative measures, therefore ensuring the fitting wetness is 5 times more effective in increasing the final crop's quality than, for example, ensuring the correct eutrophy.
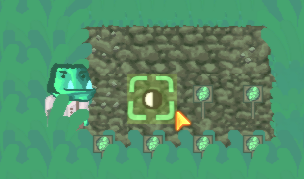
Optimality Map[ | ]
The optimality map is available by clicking the small white button at the bottom of the screen or by pressing K, if a seed is selected. Then, the optimality map shows a star rating per spot similar to the strokes for the wetness (eutrophy, windbreak, plant density) map. Big stars indicate good spots for the selected plant by comparing the ground's properties with the seed's preferences, counting in the importance of the single characteristics.
The cursor gets a small white circle too, stating how well the ground fits the selected seed. That small white optimality circle is visible if the optimality map is turned off as long as the seed pouch is equipped.

The optimality map shows a star rating for every spot, given the currently selected seed and its preferences.
Planting Seeds[ | ]
Seeds can be planted into land tiles by selecting the seed pouch tool, selecting a seed and clicking on the piece of land. The currently selected seed is displayed left to the seed pouch tool icon. Tip: if the player wants to plant the already selected seed, he doesn't have to click on the seed pouch tool to open the seed menu and select it again. He can double-tap the Q key or 4 key to open and close the seed pouch, having the pouch selected and being ready to plant the already selected seed.

Plant Growth[ | ]
Planted seeds are indicated by a small wooden sign with the resulting crop's icon on it. The plant will grow by itself and go through multiple stages, until it is ready. A fully grown plant gets a green glowing and small particles.
| Seed Icon | Plant | Total Grow Time (min) | Stage 1 | Stage 2 | Stage 3 | Stage 4 | Stage 5 | Stage 6 | Stage 7 | Stage 8 |
|---|---|---|---|---|---|---|---|---|---|---|
|
Barley | 2.7 |  |
 |
 |
| ||||
|
Spelt | 3.0 |  |
 |
 |
| ||||
|
Rye | 3.3 |  |
 |
 |
| ||||
|
Wheat | 4.2 |  |
 |
 |
| ||||
|
Corn | 5.2 |  |
 |
 |
 |
 |
 |
| |
|
Belladonna | 3.8 |  |
 |
 |
| ||||
|
Blueleaves | 4.5 |  |
 |
 |
 |
| |||
|
Dryroot | 5.2 |  |
 |
 |
 |
| |||
|
Sunflower | 6.3 |  |
 |
 |
 |
| |||
|
Lotus | 8.2 |  |
 |
 |
 |
| |||
|
Hop | 4.2 |  |
 |
 |
 |
 |
 |

| |
|
Cotton | 4.7 |  |
 |
 |
 |
 |
 |
 |
|
|
Scholar's Fire | 10.0 |  |
 |
 |
 |
|
Plants grow faster dependent on the current season. The growth speed-up factors are stated in the table below:
| Growth Speed Factor | |||||
|---|---|---|---|---|---|
| Seed Icon | Plant | Spring | Summer | Autumn | Winter |
|
Barley | 1.0 | 1.5 | 2.0 | 0.0 |
|
Spelt | 1.5 | 1.0 | 1.5 | 0.0 |
|
Rye | 2.0 | 1.5 | 1.0 | 0.0 |
|
Wheat | 2.5 | 1.75 | 1.0 | 0.0 |
|
Corn | 3.0 | 1.0 | 3.0 | 0.0 |
|
Belladonna | 1.0 | 1.25 | 1.5 | 0.0 |
|
Blueleaves | 1.5 | 1.0 | 1.5 | 0.0 |
|
Dryroot | 2.0 | 1.0 | 3.0 | 0.0 |
|
Sunflower | 1.0 | 2.0 | 3.0 | 0.0 |
|
Lotus | 6.0 | 4.0 | 1.0 | 0.0 |
|
Hop | 1.0 | 1.25 | 1.5 | 0.0 |
|
Cotton | 1.5 | 1.25 | 1.0 | 0.0 |
|
Scholar's Fire | 1.0 | 1.0 | 1.0 | 0.0 |
Every single plant has a quality ticker which checks every second, how good the ground's properties met the seed's preferences. This ticker adds a fitness value for every ground property to a so-called raw quality, which is used to calculate the crop's final quality during harvest. The fitness value is based on the distance between the preferred value and the ground's current value like the following table shows, multiplied by the importance of that seed preference:
| Distance | 0 | 1 | 2 | 3 | 4 | 5 | 6 |
| Fitness Value | 6 | 2 | 1 | 1 | 0 | 0 | 0 |
Example: The belladonna seed prefers a wetness of 3 with an importance of 2. If the ground has a wetness of 3, the distance between the preferred and the given wetness is 0 and regarding the table above, the added fitness value is 6 multiplied by the importance of 2, therefore 12 in total. If the belladonna plant grows on a ground with wetness 2 or 4, the distance to the preferred value is 1 and therefore, the added fitness value is 2*2 = 4, emphasizing the importance of placing seeds on a fitting ground.
If the ground changes during the plant's growth, for example because the player wets the land, the change is directly reflected in the plant's fitness value calculated and added per second. If the plant is fully grown, the fitness value calculation stops and the plant's decay starts.
Plant Decay[ | ]
The fully grown plant decays step by step while every decay step has the length of the plant's full growth duration. A decay step will decrease the plant's raw quality by a half quality star level and increases the amount of possible seed drops by one (up to 10). The plant stops decaying after the raw quality reaches zero. Therefore, plants on bad ground will likely leave less seeds in comparison to plants in good places, if left alone. The player has to decide if he wants to harvest early to get high quality crops or later to get more seeds back.
Tip: Selecting the reaping hook shows a small white circle on the cursor which indicates the raw quality rounded and mapped to a quality level between 0 and 6.
Harvesting Plants[ | ]
A plant is ready for harvest if fully grown, which is indicated by a green glow and green particle effects.

Plants get a green glow and green particles if they are fully grown and therefore ready for harvest (here: barley plants)
If the reaping hook is equipped, a small white circle indicates the raw quality of that plant. If the plant is fully grown, the white circle indicates the quality of the crop if harvested now. Harvesting is done by selecting the reaping hook and clicking on a fully grown plant. The crop is added to the inventory and its quality depends on how well the ground met the seed's preferences in terms of wetness, eutrophy, windbreak and plant density. If a plant is harvested before it is fully grown, the plant will return a seed instead of a crop.
A fully grown plant can drop seeds, too. Every single plant has a potential seed drop count which starts at 0 and increases over time. If the plant is harvested, every potential seed has a chance to count to the finally given seeds. This chance depends on the current upgrade level of the reaping hook upgrade as follows:
| Reaping Hook Upgrade | 0 | 1 | 2 | 3 | 4 | 5 |
| Seed Drop Chance | 15% | 20% | 25% | 30% | 35% | 40% |
Harvesting plants can also drop additional crops, if the plant is harvested (not planted!) during the crop's main season. The harvest seasons are stated in the seed table. The chance for an additional crop depends on the reaping hook upgrade too:
| Reaping Hook Upgrade | 0 | 1 | 2 | 3 | 4 | 5 |
| Bonus Crop Chance | 10% | 20% | 30% | 45% | 60% | 75% |